You are not logged in. To access all support functions you have to login to your noip client first.
How to Install the Noipfraud Wordpress Plugin
Latest version: 0.7 BETA 2 (27 Nov 2024) | Download
The Noipfraud wordpress plugin is not installed via the Wordpress central plugin website. It is a manual install. You will not be notified about available updates in Wordpress.
This guide explains how to install the Noipfraud plugin.
WARNING: If you reinstall the plugin you will loose your existing campaigns. See the upgrade chapter below for how to upgrade to a newer version of the plugin.
Whats new in Beta 2
Beta 2 added the following changes:
- The posts/pages list page in wp-admin now has a filter to only show pages/posts that have noipfraud configured.
- The plugin will now show warning if it detects common caching plugins. It will also attempt to disable caching on pages/posts that have noipfraud configured.
- When using the file picker dialog, it will first see if a folder exists in your document root with the same name as the zip file / plugin name. If it does - it will show the content of that folder in the file picker dialog. If it does not exist, then it will show files in the document root.
It also fixes the following issues:
- Users could not remove noip filtering from a page or post when it was saved. You can now remove noip from previous configured pages.
- Plugin was run even on ulrs that do not exist - this is now fixed.
- Show error messages when there are no campaigns setup, or wordpress cant read the campaigns.
- Embedded client would logout after 15 minutes. This has been extended to 24 hours.
- There we inconsistent permissions required for using the plugin. Now any wp user with edit_posts permissions can use the plugin.
Whats new in version 0.7 Beta 1?
This version is a major upgrade to our plugin.
It now has the noip client build in - so there is no need to separately upload it.
You can easily select the campaign right inside wordpress post editor with a dropdown showing all your campaigns.
You can choose to treat your post or page as either the safe/secure page (and trigger your campaign URL only when the visit is allowed), or do the reverse and treat it as your primary page and trigger the Noip campaign action when the visit is blocked.
Make sure you confirm your server setup
The steps below will change depending on your server configuration, and whether this is an install or an upgrade.
The commands bellow assume:
- you have access to the server via SSH
- you have
curlandunzipinstalled on your server - you can login as root user, or have sudo access
- your wordpress site document root is
/var/www/
If in your setup anything is different, please adjust the steps below accordingly.
First Install - Browser
This guide shows the steps to install the plugin using your browser and your wordpress admin panel.
Dont use these steps for upgrading as your existing campaigns will be deleted if you do that. Use the steps in the Upgrade chapter instead.
Step 1 - Download the plugin
Download the latest version of the plugin from the link at the top of this page.
NOTE: If you are using MacOS Safari - please right click the link and select Download Linked File instead of just clicking it. Safari usually automatically uncompresses zip files.

Step 2 - Rename the zip file
It is critical that you choose a random name for your plugin install. If you do not do this - anyone can see you have noipfraud installed!
Ive chosen snail in this example. DO NOT DO THE SAME!

Step 3 - Upload & activate the plugin
Make sure you do not have Noipfraud Connector listed as a plugin already.
Here are the steps to install the plugin. This is showing macos / safari - but other setups will be similar.
- Click
Add new pluginin wordpress - Click
Upload plugin- this will open your local file browser - Choose the renamed zip file (
snail.zipin this example) - Click
Uploadin file browser - Click
Install pluginin wordpress - Click
Activate pluginin wordpress
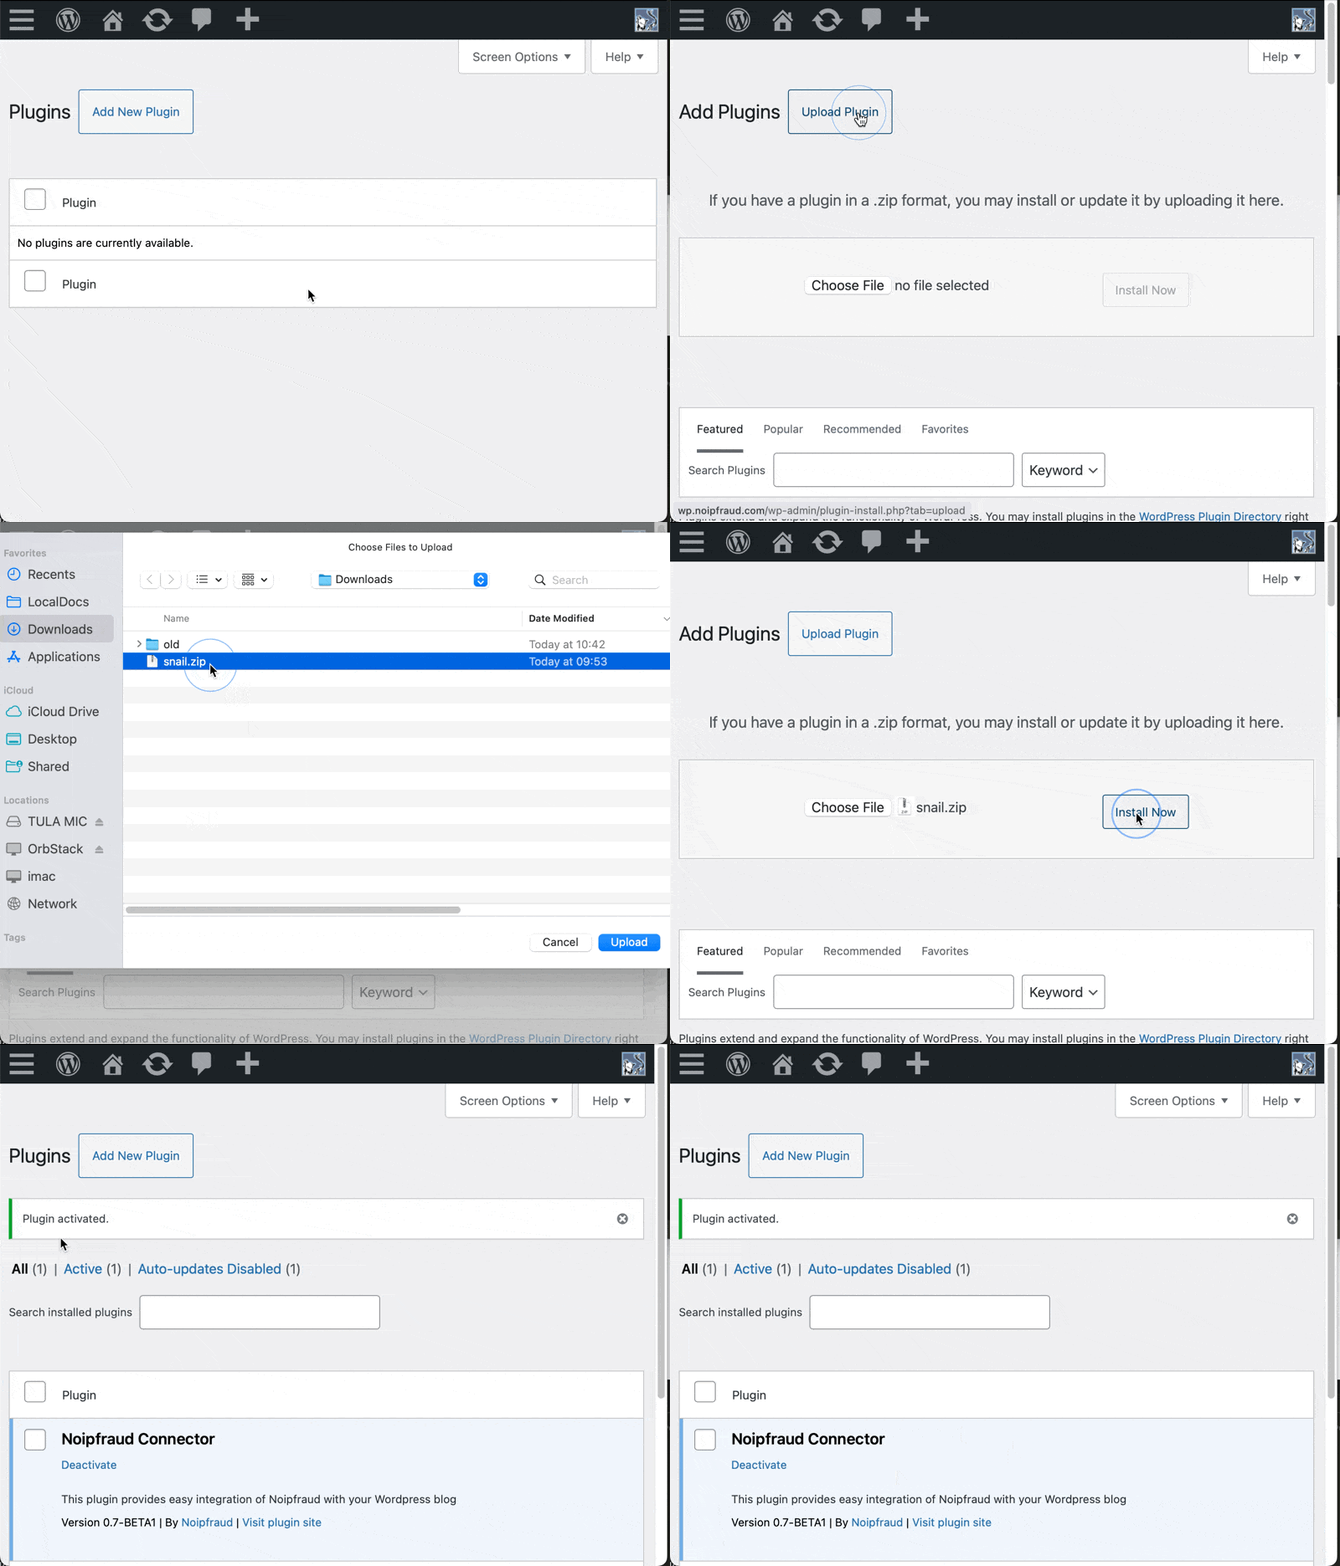
Step 4 - Configure & use the plugin
See the Congigure chapter below for these steps.
First Install - Terminal
If you prefer to use the terminal to setup - follow these steps.
These steps are for the first time you are installing the plugin on this wordpress site. Do not use these steps for upgrading your plugin. You will lose your existing campaigns if you do that.
Step 1 - Check plugins
Go to your wordpress admin panel, and select the plugins section to check if you already have the Noipfraud plugin installed.
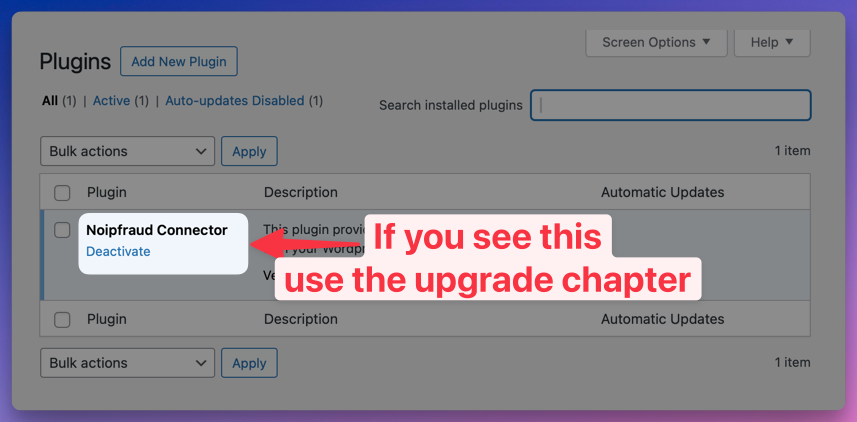
If it shows Noipfraud Connector as per the screenshot below, then you already have the plugin installed. If the latest version is newer, you can skip to the upgrade chapter below.
Step 2 - SSH into your server & navigate to the plugin folder
Use your terminal to SSH to your server and navigate to the plugin folder. The ssh command, server and path will be different - make sure you use the correct ones for your setup.
# SSH into your server
ssh root@your-server-ip

# Navigate to the plugin folder
cd /var/www/wp-content/plugins/
Step 3 - Download the latest version of the plugin
Run the command below to download the latest version of the plugin to your server.
curl -Lo noip-wordpress-plugin.zip https://cdn2.noipfraud.com/noip-wordpress-plugin-0.7b2.zip
Step 4 - Install the plugin
It it critical your Noipfraud plugin is installed in a unique folder name that cant be easilly guessed.
Dont worry you wont need to remember it. The command below will generate a random folder name for you.
# Generate a random folder name
NOIP_FOLDER=$(curl -s https://random-word-api.herokuapp.com/word | tr -d '"[]')

# Extract the zip file into the random folder name
unzip -uo noip-wordpress-plugin.zip -d "${NOIP_FOLDER}"

# Delete the zip file
rm noip-wordpress-plugin.zip
Step 5 - Activate the plugin
Reload your wordpress admin panel plugin section and verify the Noipfraud Connector plugin is showing.

Fist make sure it has the same version as the latest version listed at the top of this page!
If all is good - click 'Activate' to enable the plugin.
Once you have done this - a Noipfraud tab should appear in your wordpress admin panel.
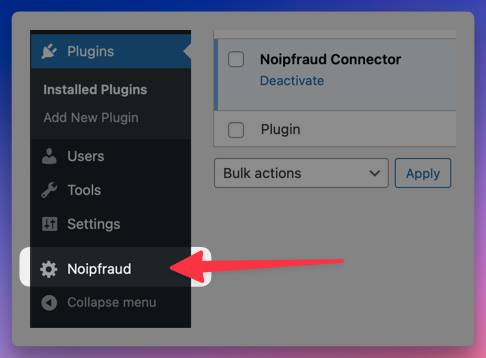
Click it.
Now move on to the Configure chapter below.
Configure the plugin
The first time you click the Noipfraud tab you will be asked to configure it.
For a brief moment the plugin will do an environment check to make sure all dependencies are installed.

If you see an error - please contact support on Telegram or email.
If all is good, you will see a message like the one below to enter your API key and secret, and set a username/password.
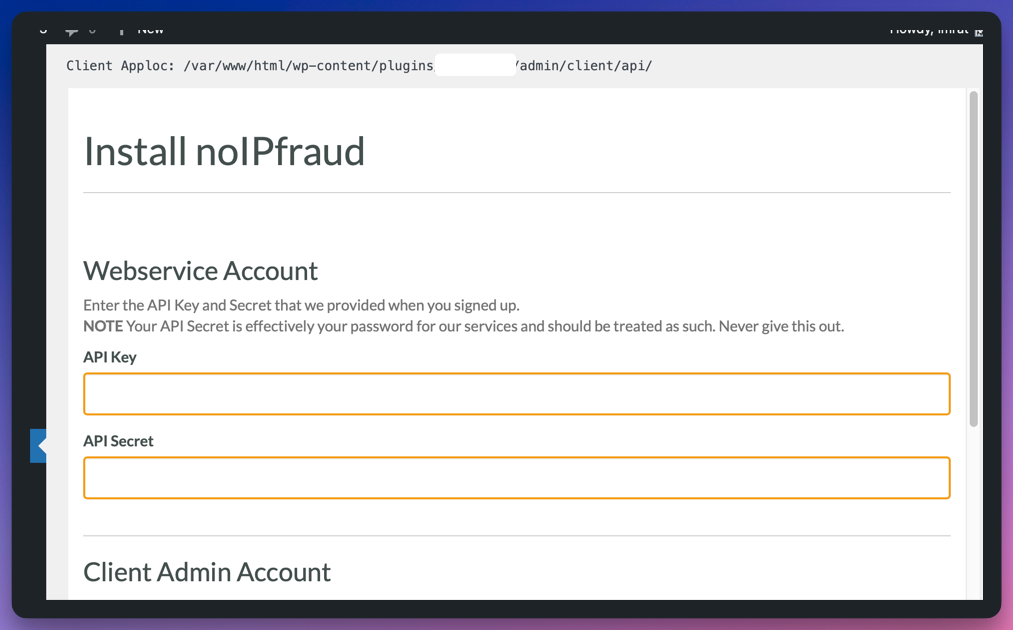
Note you will only need to enter the username/password again if you access the client outside the wordpress admin area.
If you access it in the wp admin area then you shouls automarically be logged in.
Use the plugin
Here is a brief explanation of how you can use the noipfraud plugin with your wordpress pages & posts.
Step 1 - Setup
Make sure the plugin is installed following the steps above, and that you have setup a campaign in the client.
You can use this example setup for a simple redirect campaign, with the following adjustments:
- ignore steps 4 and 6: you dont need to set the adid variable
- step 7 - as alternative page use your homepage, eg https://domain.com
- step 8 - dont enter country restrictions to make testing easier
- step 10 - this should redirect to your homepage
Step 2 - Link post or page to campaign
Now go to you wordpress posts or pages section in the admin panel and pick one of them.
Click edit.

Look for the Noipfraud metabox in the right sidebar.
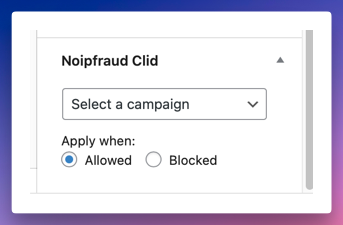
As of version 0.7 you can easily select the campaign you created via the dropdown.
We recommend that you treat your wordpress as your secondary/secure site.
The Apply when option allows you to specify when your noipfraud campaign should be triggered. This enabled you to treat your blog as your primary site if needed.
Allowed - your campaign will be triggered only when the visit is allowed, and the visitor will be redirected to the URL set as your primary page. If the visit is blocked - nothing will happen and the user will stay on the wordpress post/page.
Blocked - your campaign will be triggered only when the visit is blocked, and the visitor will be redirected to the URL set as your alternative/secondary page. If the visit is allowed - nothing will happen and the user will stay on the wordpress post/page.
Step 3 - Test
You can test the campaign by visiting the post/page in an incognito window.
Use the campaign status to force a allowed or blocked result as per step 9 and 10 in the example setup under step 1 above.
Upgrade
Only use this section if you are upgrading to a newer version of the plugin.
The latest version is listed at the top of this page.
Your current version is visible in your wordpress admin plugin section as shown below at tag 1.

Step 1 - SSH to your server
Use your terminal to SSH to your server and navigate to the plugin folder. The ssh command, server and path will be different - make sure you use the correct ones for your setup.
# SSH into your server
ssh root@your-server-ip

# Navigate to the plugin folder
cd /var/www/wp-content/plugins/
Step 2 - Backup the existing plugin
Your Noipfraud plugin folder should have a random name so you first need to identify it.
You can do this by opening the Noip connector in the wordpress admin panel.
At the top you will see the full noipfraud path next to Client Apploc:

Look for the folder name after /wp-content/plugins/ and before /admin/
In the example screenshot above the folder name is noipfraud. You need to use that name in the commands below.
Run the commands below to backup the existing plugin. This way you have a backup should something go wrong.
Make sure you update the NOIP_FOLDER value to your folder name!!
NOIP_FOLDER="noipfraud"
cp -a "${NOIP_FOLDER}" "${NOIP_FOLDER}-backup"
Step 3 - Download the latest version of the plugin
Run the command below to download the latest version of the plugin to your server.
curl -Lo noip-wordpress-plugin.zip https://cdn2.noipfraud.com/noip-wordpress-plugin-0.7b2.zip
Step 4 - Update the plugin
To update, you just need to extract the zip file into the existing plugin folder.
Make sure you still have NOIP_FOLDER variable set in your shell. See previous step if your not sure!!
# Check that the variable is set
echo $NOIP_FOLDER

# Check that it shows the Noipfraud plugin definition file
cat "${NOIP_FOLDER}/plugin.php"

# If all is OK - Extract the zip file into the random folder name
unzip -uo noip-wordpress-plugin.zip -d "${NOIP_FOLDER}"
Step 5 - Verify the plugin is updated
Reload your wordpress admin panel plugin section and verify the plugin is updated.
Check the version number. If anything has gone wrong, please do the following to restore the backup:
rm -rf "${NOIP_FOLDER}"
mv "${NOIP_FOLDER}-backup" "${NOIP_FOLDER}"
Step 6 - Clean up
Remove the zip file you downloaded in Step 3, and delete the backup.
rm noip-wordpress-plugin.zip
rm -rf "${NOIP_FOLDER}-backup"
FAQ
To follow...
Management
Get Support
Your Details
Login to your installed noipfraud client (its on your server), and click the support link in the menu to login to Noipfraud Support.